
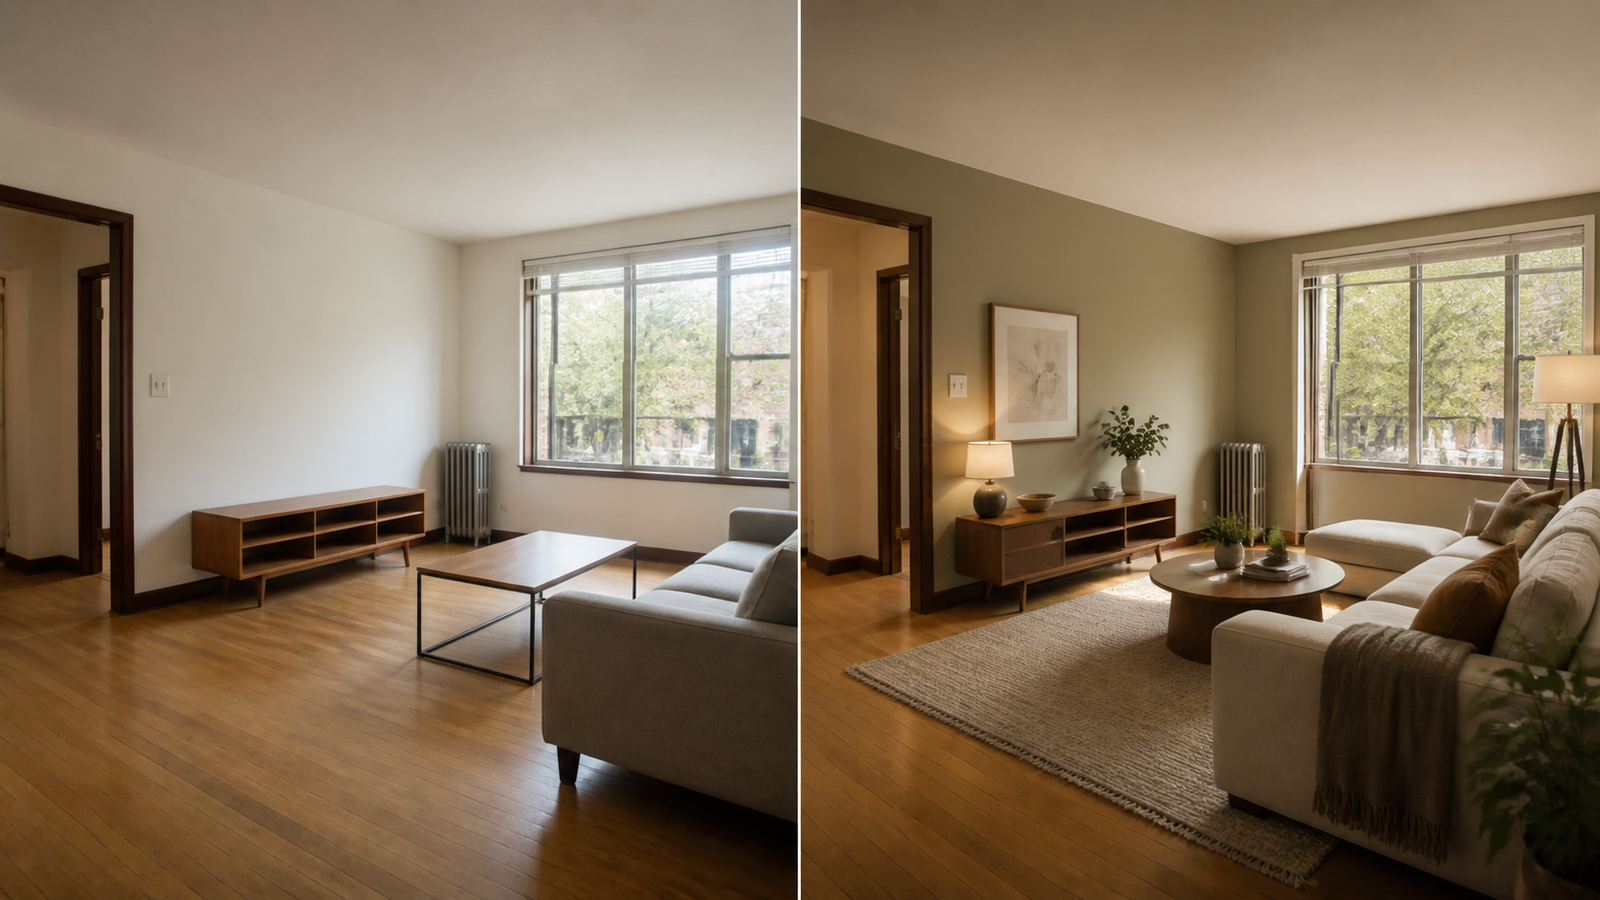
The goal is not to force an image model to become architectural software. The goal is to get a useful visual direction without allowing the image to overrule what is physically true.
Why AI redesigns often change the room
A photo-based redesign tool does not begin with your room’s construction drawings. It reads pixels, edges, depth cues, and familiar patterns, then generates a new image that looks plausible. When information is unclear, it completes the scene statistically.
That is why a dark doorway can become a wall, a wide-angle window can grow, and a shallow alcove can turn into an entire seating area. The model is solving for a convincing picture, not proving that every centimeter survived.
Four conditions make structural drift more likely:
- An ambiguous photo: tilted verticals, clipped corners, darkness, mirrors, and extreme wide-angle distortion.
- An unrestricted request: “Make this room modern and luxurious” gives the model permission to reinterpret everything.
- Too many simultaneous changes: new layout, furniture, flooring, walls, lighting, and architecture in one generation.
- A tool built for inspiration: some products prioritize visual novelty; others provide structure-preservation controls, masks, or editable plans.
AI tools are not failing when they act like image generators. The mistake is asking an image generator to answer a measurement question.
Step 1: prepare a source photo the model can understand
A better prompt cannot completely rescue a confusing photograph. Spend two minutes improving the input.
- Use the main camera, not an ultra-wide lens. Extreme lenses make the room look larger and bend wall lines.
- Stand in a corner or doorway. Show two adjoining walls when possible so the model can read depth.
- Keep the phone level. Vertical door and window edges should remain vertical.
- Use even daylight. Turn on lights only if they help reveal dark corners without blowing out the windows.
- Show the constraints. Include the door swing, radiator, built-in storage, awkward column, or low window that affects the design.
- Remove temporary clutter, not fixed information. Clear laundry and packaging, but leave major furniture if you want its position or scale preserved.
If one photo cannot show the whole space, take a second reference image. Do not stitch different viewpoints into one artificial panorama unless the tool explicitly supports it.
Step 2: write a structure-locking prompt
Put constraints before style. The prompt should move from what is fixed to what may change.
Prompt structure
Preserve: the exact room dimensions, camera angle, perspective, walls, ceiling, floor, windows, doors, built-ins, and fixed services.
Change: the named furniture, color, finish, textile, lighting, or decor layer.
Functional requirement: keep doorways clear, maintain realistic walkways, and use furniture at believable residential scale.
Visual direction: specify a restrained style, palette, materials, and mood.
Exclude: no new windows, doors, wall openings, fireplaces, ceiling height, or invented floor area.
“Keep the layout” is often too vague. Name the parts of the layout. A model can keep the sofa arrangement while moving a window and still believe it followed your request.
Step 3: redesign one layer at a time
Pass 1: establish color and material direction
Keep every object and its position. Change only wall color, rug tone, timber direction, curtain material, or lighting temperature. This gives you a low-risk style study.
Pass 2: replace one major furniture category
Change the sofa, bed, dining table, or storage, not all of them. Specify the approximate width and visual weight. If the tool supports masking, select only the object you want to replace.
Pass 3: test the arrangement
Ask for a second layout only after the original layout has produced a structurally faithful image. Require unobstructed doors, a named circulation path, and realistic clearances. Treat the result as an idea to rebuild in a measured planner.
Pass 4: add decorative detail
Artwork, cushions, plants, and small lighting belong at the end. They should not distract you from an incorrect layout or oversized furniture.
Save the best output from each pass. Reusing the last faithful image as the next reference is usually more stable than asking the model to reinterpret the original with a completely new prompt every time.
Copyable AI room-design prompts
Restyle without changing furniture placement
Preserve the exact architecture, room proportions, camera angle, perspective, floor, ceiling, windows, doors, built-in cabinet, and position of every furniture item. Change only the visual style to warm contemporary. Use cream upholstery, natural oak, a muted olive accent, woven textiles, and warm layered lighting. Keep all doorways and walkways clear. Do not add, remove, enlarge, or move any architectural element.
Replace only the sofa
Keep the room and every existing object unchanged except the sofa. Replace only the sofa with a low-profile three-seat sofa approximately 220 cm wide in warm off-white textured fabric. Match the existing camera perspective, floor contact, scale, shadows, and daylight. Do not move the window, radiator, coffee table, rug, walls, or doorway. Do not add decor.
Explore a new layout without inventing space
Preserve the exact room shell, dimensions, openings, camera angle, flooring, radiator, and built-in elements. Rearrange only the movable sofa, two chairs, coffee table, and floor lamp to create a conversation area facing the existing media wall. Maintain a clear walking route from the entrance to the window and realistic spacing between furniture. Do not widen the room or alter any wall, door, or window.
For more on getting a usable new arrangement from AI, and checking it against your real furniture before you move anything, see can AI rearrange your furniture?
Rental-friendly redesign
Redesign this rental living room using only reversible changes. Preserve all architecture, wall color, flooring, ceiling fixtures, windows, doors, outlets, and built-ins. Change the rug, freestanding furniture, lamps, curtains using existing hardware, cushions, and removable artwork. Use a calm modern palette of oat, rust, walnut, and black. No construction, repainting, new wiring, or permanent installation.
Step 4: check accuracy before judging style
Place the original and generated image side by side. Inspect them in this order:
- Architecture: count the windows, doors, wall sections, ceiling planes, and built-ins.
- Proportions: compare the width of openings against nearby walls. Look for rooms that have quietly stretched.
- Perspective: follow floorboards, skirting, ceiling lines, and furniture edges toward their vanishing points.
- Fixed constraints: confirm radiators, outlets, vents, columns, stairs, and door swings.
- Furniture scale: compare seat height, table height, and object width against doors and windows.
- Circulation: imagine walking every main route and opening every door, drawer, and cabinet.
- Physical plausibility: look for floating legs, merged furniture, unusable corners, unsupported shelves, and lights with no reasonable power source.
Reject the output at the first structural failure. An attractive palette does not compensate for a room that no longer exists.
Common AI redesign failures and how to fix them
| Failure | Likely cause | Next attempt |
|---|---|---|
| A window changes size | The opening is bright, clipped, or weakly constrained | Name its count and location; reduce exposure; mask it out if supported |
| The room becomes wider | Ultra-wide input or an aspirational prompt | Use the main lens and state that dimensions and wall proportions must remain exact |
| The doorway disappears | Darkness or furniture overlaps its edge | Retake in even light and explicitly preserve the open doorway |
| Everything changes | The request contains several design jobs | Change one category or one masked object per pass |
| Furniture blocks circulation | The model is optimizing composition rather than movement | Name the route that must remain clear, then verify it in a measured plan |
| The result resembles a showroom | The style language is too broad or luxurious | Ask for a modest, lived-in version with realistic storage and everyday scale |
| You cannot find the furniture | The model invented it | Use the image for direction, then switch to real products and product-specific visualization |
Step 5: move from a generated image to the real room
A responsible AI redesign ends with non-AI checks.
- Rebuild the chosen arrangement in a measured floor planner. Use actual room and furniture dimensions. A tool such as Planner 5D can help at this stage because the plan remains editable.
- Mark the largest pieces with painter’s tape. Walk around them and open nearby doors and drawers.
- Compare real products. Shortlist available items with published dimensions, then place their actual images in your room when possible.
- Order samples. Paint, fabric, timber, flooring, and metal finishes respond to your room’s light differently from a generated image.
- Get professional review where consequences are high. Structural changes, electrical work, plumbing, code compliance, and bespoke joinery should not be approved from an AI image.
The useful role of AI is to make options visible early, when changing your mind is cheap. Measurements and physical evidence take over as the decision becomes expensive.