
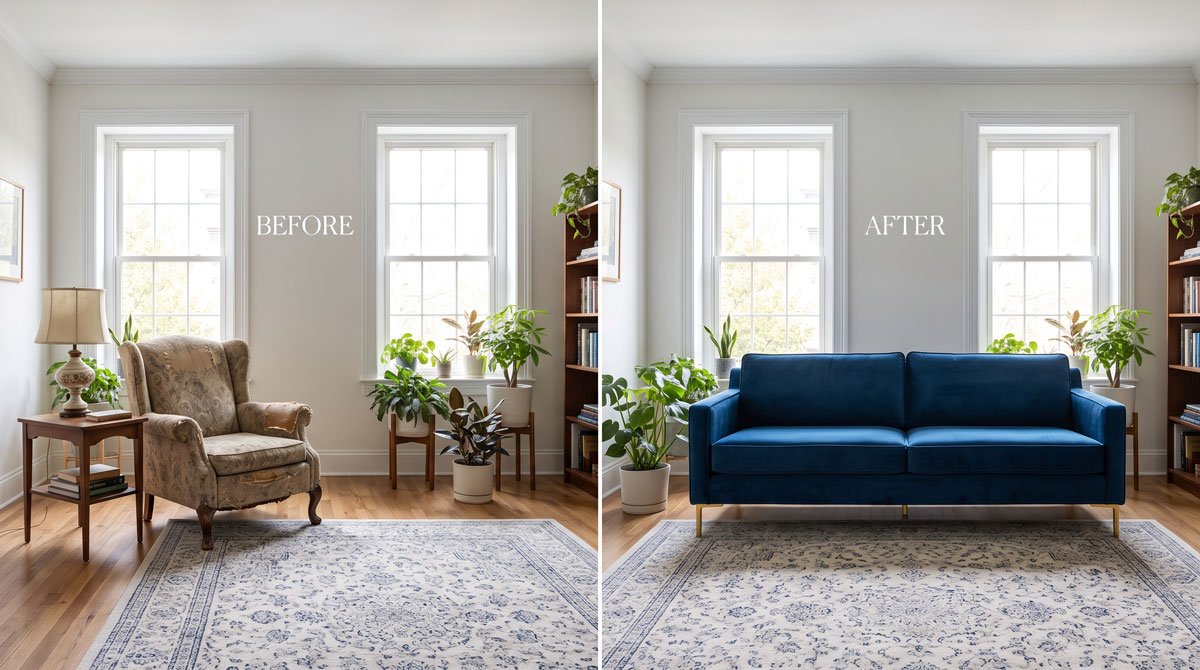
Why replace furniture in a photo instead of imagining it
Picturing a new piece in your room is guesswork. A sofa that looks perfect on a product page can overwhelm the wall, clash with your rug, or read grey-blue instead of the warm taupe you expected under your lighting. Replacing the piece in a picture of your actual room removes the guessing: you see the real product, at real scale, against your real walls and floor.
This is exactly what a photo-based AI visualizer does. Instead of an AR app that only works with a brand's own 3D catalog, DecorViz works from a flat product photo, so you can preview a piece from any store in the room you already have. For the bigger picture on why this approach wins, see AI furniture visualizer vs AR room planner.
What you need before you start
There is no setup, no app, and no measuring. You only need two things:
- A photo of your room. Shoot the wall or corner where the new piece will go, from the angle you look at most, in normal daylight.
- A photo of the product. A screenshot from the store listing is fine. Try to grab an image where the piece is shown straight-on and clearly.
That is the whole kit. DecorViz handles the lighting, shadows, and perspective matching for you.
How to replace furniture in a picture with DecorViz
The full process takes about a minute:
- Photograph the spot. Take a clear photo of the area where the new piece will sit. If you are swapping an existing item, shoot the space so the visualizer has the surrounding room, floor, and light to work with.
- Grab the product image. Screenshot or save the product photo from the retailer's listing.
- Open DecorViz and upload your room photo. This becomes the scene the product is placed into.
- Add the product photo. DecorViz composites the item into your room, adapting it to your lighting and perspective so it looks like it belongs.
- Generate and review. Check the result at full size: does the scale feel right against the wall, does the color work under your light, does the style sit well with what you already own?
- Download or compare. Save the composite, or run a second product through the same room photo to compare options side by side before you decide.
That is the entire loop. No 3D models, no room scanning, nothing to install.
Tips for a realistic result
- Shoot straight-on when you can. A square-on angle of the wall or corner gives the most natural placement.
- Keep the target area visible. When you are replacing a piece, framing the spot clearly helps the new item land where you want it.
- Use the room's normal lighting. Photograph in the light you actually live in so the color preview reflects reality.
- Do not stress about a perfect photo. DecorViz handles ordinary phone photos and dim rooms well, so you do not need a staged, studio-lit shot to get a result you can trust.
Other ways to use it once you get the hang of it
- Compare two or three finalists in the same room photo and pick the winner in context. More on this in the best way to compare furniture options before buying.
- Test a color or finish you are unsure about by previewing the same product in a different colorway.
- Preview the big anchor piece first, like a sofa or bed, then build the rest of the room around the winner. See how to try sofas in your own home before you buy.
Common mistakes to avoid
- Judging from memory. Comparing options from separate browser tabs is guesswork; preview them in the same room photo instead.
- Using a tiny thumbnail. A slightly larger, clearer product image gives a cleaner composite.
- Skipping the final fit check. A preview confirms scale, color, and style; still confirm exact clearance against the listing dimensions before you order.
Want the full verdict on the tool itself? Read our hands-on DecorViz review.